Reality

Anyone ready for yet another venting of feelings, emotions, and struggles from me? Yeah, I’m guessing not, but it’s happening anyway. As with my last two posts we are jumping in, forgetting the editing (sorry for the grammar lovers out there), and expressing my feelings. Is everybody ready? Then let’s go.

I want to talk about 2 reality checks I wish people, particularly Americans, would have. I know a significant portion of you amazing, and lucky, followers are foreign. How you must be laughing at my country right now. Or crying for us. It probably flips between the two. The first is the word people keep throwing around about how “careful” they are. The second is the reality check of the timescale we are looking at with COVID.

So let’s talk about “careful”. Do you know how often people throw that word in my face? Every. Single. Day. They think because they wear a mask to the store they are the very definition of “careful”. Now, don’t get me wrong, masks are so important in public I cannot stress it enough. If you go in public without a mask you might as well stop reading now. I can’t help you. But the idea that wearing a mask in public somehow earns you a “careful” title like you’re some kind of Animal Crossing character is ridiculous. Yes, you’ve cut out one source of infection. But if you do nothing about all the other sources of possible infection the word you’re looking for isn’t “careful”. It’s “reckless”.

Image

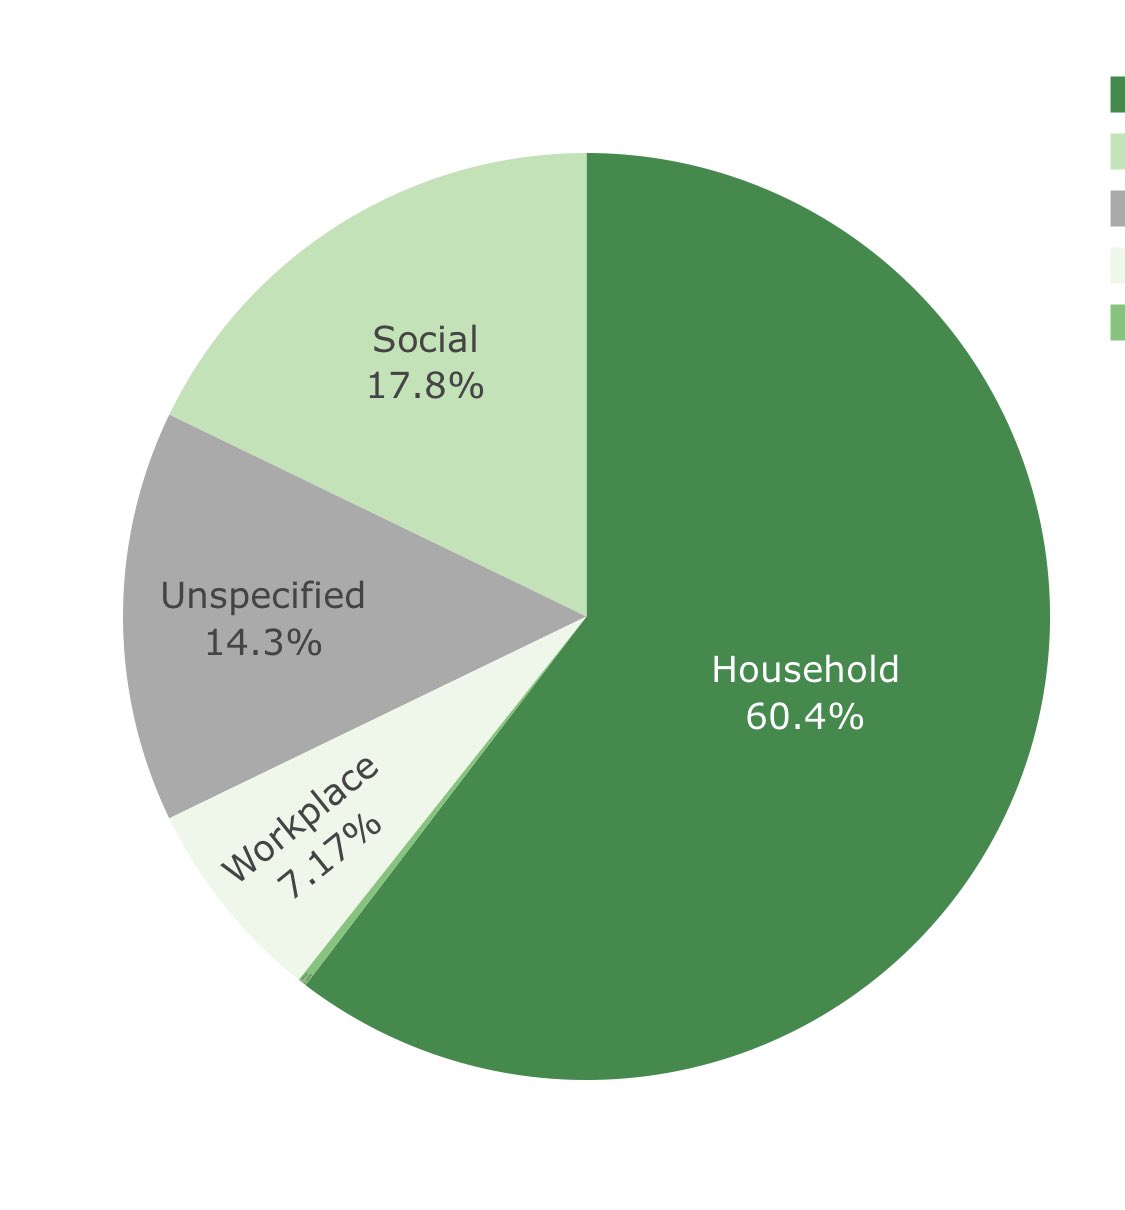
Let’s talk about this graphic. This graphic shows the percentage of where people got COVID from in my state. While these aren’t exact numbers for every state (they are my state’s numbers), the proportions of the pie chart are pretty similar for other states. And this is not exact risk, because risk is defined by the amount of community spread in your area. But this graphic is a good reminder of how risky your choices are – the more percentages you can cross off your potential exposure list, the less likely you are to get COVID. “Unspecified” means everything outside of social, workplace, and household. This is school if your kids are in it, shopping and stores, dining in restaurants, and all the other little interactions we have with people daily. Now, for this example I need to break up the “Household portion” based on the percentages of the other groups. Because if you are the safest you possibly can be it doesn’t matter if your household is being unsafe – your household will determine, to a large extent, your risk level. So the math comes out to (yay, math, right?) 45% of household members got their COVID from social interaction (this is 27% of infections), 35% got it from unspecified (21% of infections), and 18% got it from the workplace (now 11%). And once again, these percentages also need to factor in amount of spread in your community – I’m not saying your true risk are the following numbers. But this is the true risk factor taken into account with community spread. So while it’s not the complete number, it is a portion of the complete number.

Now, let’s get into the nitty gritty. Let’s say you wear masks to the store, don’t dine in restaurants (I mean never. Taking off your mask in a public space, no matter what reason, is a big no), don’t go to the gym (because even with masks they’ve shown gyms to be pretty unsafe, plus most people working out don’t wear masks and that’s an enormous risk), and don’t have kids in school yet. That sounds super careful, right? Yeah, it’s not bad. If you do those things you’ve cut out 14% of your risk level. That’s it. JUST 14%. Your behavior is now at an 86% risk of getting COVID. Does that honestly sound “careful” to you? Now let’s add your household into this (roommates, parents, significant others, children – every single person you live with). If every single person in your household does all of those things you’ve cut out 14% of risk plus the 35% of household risk (which equals 21% risk because it’s 35% of 60%… Everyone following?)- you’ve now cut out 35% of the risk. You’re now at 65% risk of getting COVID. And seriously- that means every single person follows every single rule. Kids wear masks, especially at school, no one goes to the gym, everyone follows the rules and you’re still at 65% risk of getting COVID. “Yeah I’m super careful I wear masks to the grocery store” doesn’t sound so careful anymore, does it?

What if you’re lucky enough to work from home? Sounds awesome, right? Now you’ve only eliminated 21.5% of risk (unspecified + workplace). Does everyone in your family get to work from home? Yes? That’s fortunate! So if you, and everyone in your household, follow all the “unspecified” rules and work from home or have rigorous workplace regulations you’ve eliminated 53.5% of the risk. That’s it. Doing all those things combined for your entire household still only gets you to 53.5% risk elimination. That’s better, but still barely over 50%. If I told you the odds of getting attacked by a shark if you went swimming were 46.5% would you honestly go in the water?

Now for the big one – socializing. Socializing is the hard one for people to cut out. But it’s also your biggest risk. If anyone in your household socializes in an unsafe way you will never get below a 46.5% risk. EVER. When you use the phrase “I’m super careful” to me and I can see your instagram, your photos, your telling me about all the things you’re doing, your unsafe interactions all I can think is “I do not think that word means what you think it means”. Allowing your family to have that much risk is not careful.

So what do we do, Teri? I’m so bored/lost/anxious/want everything to be normal. You can minimize that 46.5% risk by doing one very simple thing – closed social circles. For those of you science/mathmatically minded closed loops are easy to understand. For others, let me demonstrate with a long paragraph:

If Ellie (yep, going with Ellie because, spoilers, she was frustrating in TLOU II) only socializes with her family that sounds safe, right? She has 3 siblings and 2 parents. She sees 5 people regularly. Oh, and their kids. So let’s make it 10 people, without masks, not social distancing. Those 10 people are being the “careful” we’ve just talked about. Oh they wear masks to the stores, but they dine in restaurants sometimes (life is hard enough!), and their kids hang out with friends (they’re just so bored!), and one sibling has roommates (yeah, they hang out with their friends. I’m not sure who). How safe does Ellie sound right now? Ellie’s circle includes not just her 10 family members, but the friends of the 5 kids, and the friend’s parents, and the parents friends, and any other friends those kids hang out with. Let’s go with an even 10 people per kid (friends, families of friends, and friends of friends – honestly 10 feels conservative). Ellie is now up to 60 people she regularly comes into contact with without social distancing and masks. Then Ellie’s sibling with roommates – let’s count her numbers. Let’s see, she has 3 roommates, who each have 5 friends they hang out with on a regular basis. But those 5 friends also have 5 friends. We don’t need to go further. I’m pretty sure you’ll get the point. So that adds 30 more people to her list. She’s now up to 90 people she comes in contact with regularly without masks. Still sound safe to you? Let’s add yet another option in (but wait! Isn’t that enough? Oh, honey, this isn’t even the worst open circle I know about). Let’s say one of Ellie’s siblings starts dating someone. So we only add one more person, right? Wrong. We’ve not only added one person, but that person’s family that they see, all the people their family sees, and that person’s roommates, and all the roommates friends. We’ve just added another 90 people to Ellie’s circle. And the list never ends. Because this is the opposite of a closed circle. The risk is real, here, folks, despite the fact that Ellie wears a mask and “is so careful”.

Is Ellie more careful than the person who wanders around maskless, protesting, and shouting in people’s faces about “their rights”? Of course she is. I just wish Ellie, and people like her, would stop kidding themselves about their level of care and waving around their idea of themselves as “careful” like they’ve won some kind of award. You’re behavior is risky. Admit it. I care, on a professional and personal level, whether these people are actually careful. But I don’t get to make their decisions for them. They get to be risky all on their own. All I want is for them to take responsibility for their risky behavior and stop using the word “careful” when they really mean the opposite.

You want to talk about a safe social circle, the ones the experts discuss? Let’s talk about my social circle. Did you know that I can name not only every single person I have close contact with without masks on, but it is less than 20. Every single individual I come in contact with also has a closed circle. So my circle is literally the handful of people I see and the handful of people they see, who also see no one else. Sounds complicated? I’ll explain better. We see, on a regular basis, two families. One of 3 and one of 5. The family of 3 has regular contact with a married couple, who have contact with no one else. So right now my circle is up to 10. The family of 5 sees a married couple and a family of 4, who only see each other. So the entire circle of the married couple and the family of 4 is 6. My entire potential social circle is 16 people. That’s it. Is it hard? Yep. But we’ve all made the agreement that this is our life and for months on end we’ve all stuck to it. And if, for unfortunate reasons, somehow that circle is broken (one of the families comes in contact with someone outside our circle for any reason) they isolate themselves for 10-14 days to ensure they aren’t putting the rest of the circle at risk. Being truly careful is doable, folks. It’s hard and involves a lot video calls and outdoor physical distancing picnics to see people outside our circle. But we are being careful.

Now for a caveat. I understand that there are situations completely outside of our control. One of the people in my social circle is a teacher and school is going back in session soon. Several of the kids in our circle are school-age and will be attending school. Luckily our state has a mask mandate for all school children and workers, but it definitely weakens our circle. These are circumstances beyond our control and they increase our risk. There are things we literally can do nothing (or next to nothing) about. But we are doing everything we can to mitigate our risk outside those mandatory circumstances. So our risk level, when school starts, goes up. But you know what, it’s a hell of a lot lower than the risk level of Ellie, who adds all the school-age kids and young adults (college, possibly), to their 180+ circle.

Once again, if people choose to make risky choices I can’t stop them and I can’t protect them. But they need to stop calling their actions “careful” like they’re actually attempting to be part of the solution.

Now let’s get into an even worse downer – the reality check. This is the reality check I wish most people could wrap their heads around. It’s the one scientists and public health experts and historians have known from the beginning. This virus isn’t going anywhere for years. Let me repeat that. This virus isn’t going anywhere for years.

There are two ways to get rid of a virus (or at least control a virus).

  1. Douse the fire. Think of it like a fire. Fire requires oxygen to survive, so you douse the fire, cut off it’s oxygen source, it’ll die out without spreading. What is the equivalent of dousing the fire for a disease? Treatment at the source. It means being able to treat a person and cure them of the disease before it has a chance of spreading to another person. There are no known treatments for COVID. Nothing we have will, to our knowledge, kill COVID. The best we can do are symptomatic treatments, which may make your symptoms less severe so you don’t die while your body naturally fights and kills COVID on it’s own. So option 1 is totally out for COVID.
  2. Remove it’s source of fuel. If we need to stop a fire we need to make sure the wood and materials around that fire can’t burn. You need to remove it’s food source. You can use fire suppressant, you can use water, you can do whatever it takes to get rid of it’s possible food options. If there’s nowhere to burn, it’ll die out on it’s own. Simple right? Let’s apply that to a disease. Humans and other animals are the food source for COVID. This virus will keep jumping around, infecting people as long as we give it a food source. There are a few ways to get rid of the food source for COVID – physical distancing, a vaccine, and herd immunity. Let’s talk about those in more detail.

Let’s start with herd immunity because it’s the easiest. Herd immunity means everyone goes back to their daily lives, no masks, no nothing, just back to normal. This strategy is also called “cull the herd”. It means we accept that our actions will kill a portion of the population and we don’t care. For herd immunity to be reached with an actively spreading virus estimates are that 80-90% of the population will need to become infected before the virus will go away. Let’s take the United States, because, well, I live here. There are 328 million people in the US. Let’s say only 80% need to become infected for herd immunity – that means 262.5 million infections. With a true death rate (that means the infection fatality rate) of roughly 0.5-1% (let’s go with the lower number so as not to shock you too much) that means 13.12 million people will die from COVID. Probably within a 3 year time frame. You want world numbers? Okay – 7.656 billion people. That means 6.125 billion infections and 306 million deaths. Does herd immunity still sound like a good idea? Callous, data-driven scientists, when we aren’t taking into account actual human life and are simply looking at the numbers, call these diseases population culling diseases. Removing 0.5% of 7.656 billion people is a number I don’t think we can actually comprehend. That’s removing the population of the United States, the third most populous country in the world, in 3 years. And that doesn’t include the 30% of the population that will have lifelong neurological and/or physical damage because this virus leaves 30% of survivors with scars that’ll probably never heal. That’s nearly 2 billion people with severe long-term, possibly lifelong, side effects.

So we need a vaccine! A vaccine will be nice – but it’s not going to save everyone. A vaccine, at the best of times, is 70% effective. So that means, if 100% of the people in our country get vaccinated, 30% will still be vulnerable to COVID. With herd immunity already pinpointed at 80-90% that means 10-20% of people would still have the possibility of getting sick if we can’t wipe it out of our communities. Now, that’s a best case scenario. There’s no way on the planet America is going to get that lucky. First of all, most vaccines are looking to be about 50-60% effective. Which means 40-50% of people who get vaccinated will still be at risk of getting COVID. And that doesn’t take into account the roughly 1/3 of the population in the US who poll in at “anti-vaccine”. So if 33% of the population doesn’t get vaccinated plus 26% of the population aren’t immune because of vaccine efficacy we are looking at 59% of the population of my country not having protection against COVID. Then we still have to make up the difference to get to 80% immune. The vaccine won’t save us unless we do more.

Physical distancing is the best cure we have right now – it’s really the only cure we have right now. If we stay away from each other we can keep the fire low – the virus can’t jump to another person and restart if there isn’t a person to jump to. That’s why 6 foot distancing and mask wearing is SO IMPORTANT. I cannot stress enough how important this is. If we give the virus nowhere to go it’ll get under control all on it’s own. That’s how New Zealand did it. It’s how Taiwan did it. It’s how Vietnam did it. Distancing until this virus is gone or until we can start vaccinating will save our world from so much pain and sorrow. I wish people could just get. this. through. their. heads. STOP SOCIALIZING and we may not have to stop socializing for much longer. The more you do it, the more fuel you’re giving the fire, the longer this will take to get under control.

So what we need is a mindset change. Stop thinking of this as a short term problem and start visualizing it as a long term problem. This virus isn’t going anywhere until either herd immunity is met (with or without a vaccine) or we can burn the virus down to nothing. So figure out a long-term, sustainable game plan for getting life back to as normal as you can. John and I have already figured out our game plan. It’s not easy, especially with a 4-year-old, but it’s sustainable and removes as much risk as we possibly can. Change your mindset and focus on creating a long-term plan that minimizes your risk of not only contracting the virus but of spreading the virus. If you want tips or help – I’m here. It’s not easy, but we’re in this for the long haul. We’re looking at at least a year (at the earliest) before life slowly starts to normalize. If people change their mindsets and come up with a plan now we may finally be able to nip this virus in the bud.

I Can’t Save Everyone

My last post was so cathartic I kinda wanted to do another one. I really feel nearly 10x better after writing that last post. Almost nothing has changed but I think expelling some of the frustration I’ve been feeling really helped me cope. So let’s do another one! As with my previous post there will be no editing, no going back to ensure coherency, nothing. This is just me, reminding myself of the things I’ve been working on the last few days.

Even after my last post I couldn’t shake the depression. That was, honestly, to be expected. I’m carrying a bit of weight here – it’s understandable I can’t shake it after one post. But I realized, in talking to my husband, that some of my problem came from carrying the burden of other’s choices. They wander around, not wearing masks, throwing COVID parties, screaming at store employees, gathering indoors, and protesting the very things that will save them. I read it in the news, I see it in my local town hall meetings, I hear about it from friends, I notice it every time I walk out the door. It feels like a slap in the face. I’m putting my life and sanity on the line for a bunch of people trying their hardest to ruin everything I’ve worked for, trying their hardest to kill (inadvertently, true, but still at fault) the most vulnerable in the population, including my family. It hurts me to see how much people disregard the truth because it’s inconvenient, because it sucks, because whatever.

And it hurts that their decisions could hurt the people I love. I have several immediate family who are high risk, several in-laws who are high risk, and the probability that myself and my son are high risk. There’s a lot riding on other people to do their part so my family can be safe. And I hate that the lack of respect and compassion that people feel toward one another will keep this nightmare lasting for a very. long. time.

But I came to realize the other day that I can’t save people. I can protect myself and my family the best I can – with knowledge, with advice, with recommendations, but they are ultimately going to have to save themselves. I can’t stop Karen from getting sick – I can’t even stop her from passing it along to my friends and family. All I can do is my best to educate, to test, to compile data, to do my job. I can’t save everyone.

There are several things I wish I could do. I wish I could ensure that the only people who get sick and die are the people making the bad choices. But that’s not how viruses work. Let’s say you wear a mask but Karen doesn’t. You’re risk of getting sick from her is not as high if you’re wearing a mask but it’s much greater than 0 if she’s not wearing one. And it’s not even 0 if you’re both wearing a mask but not social distancing. I can’t stop you from possibly getting sick if you’re vaccinated (vaccine’s have complicated protection factors, DM me on instagram if you want the long explanation) if Karen chooses not to get vaccinated. I can’t even protect the people who are trying to be cautious. But I especially can’t protect people who aren’t listening at all. People who are going to gyms, people who don’t wear masks, people who dine in at restaurants, people who stand right behind you in line at the grocery store, people who feel like concerts, like movies, like religious services, like barbecues are somehow safe. And then, in a league of their own, are the socializers. These are the people who have open social groups, who don’t know who their friend/neighbor/family member has been hanging out with but they think it’s safe to see them because they only hang out in groups less than 10. Or some other arbitrary number that actually means nothing to a virus. Because if you hang out with 10 people, but those 10 people all hung out with 10 different people a few days before you just spent an evening with 100 different infectious possibilities. Not 10. But somehow, no matter how often public health officials say it, no one is listening.

It’s extra hard with families. Family has always been safe -they’re familiar, they’re home. they’re comfort, they’re protection. But this virus doesn’t care about how safe your family is supposed to be. Family is not a safe zone. Because people let their guard down with family. They assume that family is safe, despite the fact that brother has roommates who don’t care about social distancing, or sister goes to bars because she’s young! what’s the harm? The virus doesn’t care that you love mom and dad and would never want to hurt them but I’m for sure going to visit for the weekend/have sunday dinner despite the fact that you aren’t allowed to remote work anymore. That’s the scariest part about family – you let your guard down, because family is supposed to be safe. But what you don’t know is that, because you can spread the virus for about 48 hours before symptoms even show up, or show up at all because you’re asymptomatic, you could be hurting the people you love and you don’t even know it.

I can’t save anyone who doesn’t want to be saved. I can’t save the neighbors, I can’t save Karen, I can’t even save my family. I have so much knowledge, nearly 15 years of experience, knowledge, and expertise, and despite trying my hardest and doing my best I can’t protect them. They call it “different circumstances”, “living your life”, “constitutional freedom”, “you just don’t understand”, “my rights”, “a conspiracy”, but what it really boils down to is choices and sacrifices. I can’t force people to make safe choices and I can’t force people to make the necessary sacrifices to ensure their safety. I cry nearly every day from the fear of losing someone I care about. I cry for the 140,000+ US fatalities whose families have already lost someone they cared about. I cry for the hundreds of thousands of people who are going to lose someone they care about before this is over. I wish I weren’t afraid for the people I love but it scares me so badly that sometimes I just feel empty inside.

I, alone, of everyone I know (outside of work) understand the reality of viruses and pathogenesis on a high level. I’m not THE expert, I’m not even a doctorate, but I understand it better than they ever will. And I have the benefit of my colleagues, my understanding of scientific literature, and the regular updates I receive in my job, to broaden and expand my knowledge. But it doesn’t matter – because my knowledge can’t save them. My example can’t save them. My pleading can’t save them. After all I can do the rest has to be up to others. I need to accept that. I need to accept that if and when something goes terribly wrong it’s not my fault. I did everything I could – to the point of people pushing me away, to the point of threats from the public, to the point of losing friends and family. The rest is out of my hands. I think if I can ever accept this truth I may, finally, start to feel okay.

Now, readers, I understand that this makes it seem like no one is listening to me. It’s not true. I have several family members who are taking this just as seriously as they should – I have several who don’t even need me to take this seriously. I have friends who want to learn and ask me questions all the time. I have people who give me hope that the others may come around. And I have you, who read despite the fact that this isn’t about gaming or food. So while I need to accept that I can’t save the people who aren’t listening as much as I wish they were, I also need to understand that there are those out there who do care and who are listening. Maybe focusing on them will help, too. Because if I can’t save everyone maybe I’ve helped save one.

It’s Been A While…

And I know you’re all looking for a recipe – this is a recipe blog, after all. But I’m going to take the next post (or two, or three, or ten) for myself. I’m well aware that I may lose followers (if, indeed, any of you still exist out there) or have some other backlash that I am completely unaware of but I think it’s time to take the advice of my really good friend Kim and purge some of the anxiety that I’m going through right now.

This is maybe not going to be a happy post – it may even be downright depressing. So be warned before you proceed. This is going to be a post where I work on just expressing how I’m feeling, acknowledging the realities of my situation, and attempting to cope with the overwhelming strain of the situation I’ve been thrust into. This is probably 100% going to turn into a stream-of-consciousness post and now you’ll get to learn that I’m not necessarily that great at writing. So good luck if you decide to read. If not, this was really for me, anyway.

As some of you know I work for my state public health laboratory. I’m a microbiologist who started working in microbiology in 2007. I’ve held a variety of jobs within that field but I specialize in infectious diseases that have a high mortality rate. I’ve studied the immune response to and infection mechanisms of those types of diseases for 13 years. I’ve specifically worked in public health for over 8 years and have specialized in diseases that cause outbreaks or have high mortality rates. I’ve been a part of the flu response nearly every year, was a part of the Ebola testing team during the Ebola crisis a few years ago, and was the head of the tuberculosis program for my state for over a year. I’ve had entire semester-long classes dedicated to vaccine study and have been trained in epidemiology and epidemic and pandemic response. I’ve also spent the last few years programming data tracking systems for my state and working with the CDC and Association of Public Health Laboratories on data transfer and collection between entities. So to say that the current COVID-19 crisis is literally my area of expertise is an understatement. I have been trained for a pandemic of this nature for over 13 years. Everything I know, everything I have been taught, has prepared me to understand and extrapolate data and information in a very real way.

And yet, being trained for this situation has placed a burden upon me and my coworkers that very few people in our modern time have ever had to bear. Every public health expert, every laboratorian, every healthcare worker assigned to COVID-19 has been given the burden of the world to carry on our shoulders and, at first, it was easy to bear. We were praised (well, not us scientists as much as the doctors and nurses, but we pretended like we were praised along with them), we were deferred to as experts, people trusted us and believed us and were willing to sacrifice for the good of the people around them.

But then things got harder and we were asked to continue to bear a burden no one should be asked to bear. We’ve been asked to work obscene amounts of overtime with, in the case of my state, no overtime pay. We aren’t even paid for hours over 80 per 2 week pay period – we earn “comp time”, which is essentially PTO we can use at a later date… What later date? It expires every 6 months and, well, if you haven’t noticed the pandemic hasn’t let up enough to allow us to take that time off. So our overtime hours expire and we’ve worked 60+ hour weeks for 5 months straight for nothing. And when we ask when we will have relief – a day off, extra help, or even just not having to work 7 days a week anymore the answer is always “when the pandemic is over”. Which could take up to 2 or 3 more years… So what we’ve been told is that, in 2-3 years from now, we won’t be breaking ourselves anymore. Trust me – we’ve already broken.

But still it felt okay – we had people praising us (or, at least, the healthcare professionals) and people still looked to me for answers. I am the expert, after all. The ACTUAL, REAL expert. Until that wasn’t what happened anymore. People in public health started receiving death threats for trying to protect people by mandating masks. A stupid, simple thing – just wearing masks. No shoes, no shirt, no mask, no service. There is NO DIFFERENCE between not being able to shop naked and not being able to shop without a mask. Yet multiple public health experts have been forced to resign because the death threats got to be too much. There have been threats coming to my team, my coworkers, to the testing site collection teams, to the people who are still putting their lives and their physical and mental health on the line to protect the public. Because of any and all possible stupid reasons you can think of. Because people are scared and selfish and inconsiderate and think that threatening us will make a plague go away.

And then the threats on our jobs have started coming down from politicians. Public health experts have been removed from their positions because they pushed back against the politicians. My job, and the job of my coworkers, is threatened if I don’t complete irrational projects by insane due dates. The politicians know this is an election year and demand more than we can possibly give. And all we are trying to do, all we have ever tried to do, is our best. Working long hours, giving up our health and sanity and personal connections, barely surviving isn’t good enough to those in the ivory tower who care more about their image than their employees. And that doesn’t even cover the discrediting that is being done by major politicians against the public health experts who are trying to avert an even worse tragedy than we’ve found ourselves in. We’re doing our jobs and getting absolutely hung, drawn, and quartered by the politicians and the citizens we are trying to protect.

But that’s okay, right? As long as our families are here to support us… Well too bad that train pushed us off the rails a few months ago, too. When they started questioning my expertise with their favorite news channel’s host guessing at what things mean. Or insisted that the knowledge of someone in any old scientific field was equal to mine. Or want to stop me right there, I obviously haven’t considered the impact these measures have had on one aspect of life or another. When the lack of trust, the attempts to discredit me, and lack of care so many of them have shown for me began to happen was the day I truly broke under the strain. It was the day I realized that most of my relatives had completely ignored me, and almost no one had attempted to check up on me, though I constantly tried to check in with them to make sure everyone was armed with knowledge and knew someone was thinking about them.

That was when I felt the last reserve of my strength drain. Going from being the hero to the villain in a story is unpleasant. Especially when nothing has changed – I’m still trying to carry the burden of the pandemic, along with my coworkers and fellow healthcare workers, just the same as I was in April. The truth and the scope of the pandemic has not changed. NOTHING HAS CHANGED on our side. What has changed is the rest of you. I’m exhausted, mentally and physically, from fighting – fighting misinformation, social media, the news, the public, the protesters, the threats, the bosses bosses, the politicians, and my own relatives. I’m fighting so hard to protect people and I just keep getting thrown to the ground and under the bus, over and over again.

This is easily one of the worst tragedies of modern history. over 130,000 Americans have died from COVID-19 since February. You know the last time 130,000 people died from an event in the US? World War II. Though, the US involvement in World War II lasted 4 years and had a total of 405,000, which brings the average deaths per year to about 100,000. COVID-19 has already surpassed that average in 5 months. And, if we aren’t lucky and people continue to ignore the true scope of this pandemic, it’ll definitely surpass the total number of deaths from WWII. If we do, in the next few years, surpass 405,000 deaths from COVID-19 in the US that will make this current pandemic the deadliest event to happen in US history since the 1918 Great Influenza. The worst thing that has happened for over 100 years. Think about that.

Can we all try to be a little kinder and more considerate of the people who are trying to prevent this from becoming the biggest loss of life the US has ever seen? Can we stop being so callused to the fact that this is not going away and resolve to change our behavior for the long run in an effort to save people? If you realize this is the worst thing that has happened in 100 years maybe we can all resolve to adjust our lives for the meaningless time frame of a few months, a year, two max, to protect each other. I bet, if you promised to help shoulder some of this burden, I’d feel mine to be a little less. And then maybe I could get the good night’s sleep I haven’t had since February.

A Little Bit Longer

Hey, everyone! Did you know you’re the best? Like, really, the best people? You’re patience and kindness is unbelievably relieving to me. What with one thing and another, I’ve had to take a longer break than I intended. I’ve been dealing with surgery, illness, and family and work issues. So instead of the regular recipes and exciting new things you’ve been waiting for I think I need another few weeks to recover all the aspects of my life. This will help me get back into the swing of things and back to regularly posting much sooner than just half-heartedly throwing things out there.

Again, you guys are the best for sticking around! Hopefully it won’t be too much longer until I feel up to posting again!

Houston Outlaws Macarons

Houston Outlaws Macarons

I’ve gotta be honest – Houston has some of the best colors in the Overwatch League. I love Boston, and I like their colors, but the sleek black and lime green of the Outlaws is just classic. Houston is my older brother’s team and while they’ve struggled a bit in this first stage of season 2, I think they’ll really pick up once the meta changes. I mean, they’ve got Jake-rat, after all. How much more of an advantage could you ask for when his best hero gets a massive buff?

Houston Outlaws Macarons

If you haven’t read the Boston Uprising Macaron post and recipe, please go do that now. I go into quite a bit of detail on how to make a macaron in it, the processes and the tricks. I’m not going to go through those things again, in order to make a shorter, more concise post, and a much easier read. So please, I’m begging you, go read that post!

Let’s start with the shells! One egg contains about 30 grams of whites, so this recipe will take about 3.5 eggs. Separate your egg whites from your yolks, placing the yolks in a separate bowl (to be used for the curd later) and place the whites in the bowl of a stand mixer. Add a whisk attachment (or use a bowl and hand whisk and watch as your arm falls off) and turn on the speed, slowly bringing it up to high. Continue to whisk until the eggs are frothy, then add all the cream of tartar at once. Continue whisking until the eggs start to form soft peaks.

At this point add the sugar. You can either do it the fancy way, one tablespoon at a time, but I just add the sugar around the bowl (not all in one spot) and continue to whisk on high until stiff peaks form. These peaks should not, under any circumstance, fall over if you tip the bowl or the whisk upside down. You want the meringue completely stiff (though not overwhipped. It’s a fine line). In order to make sure it’s not overwhipped, just watch it. As soon as it’s thick, shiny, and holding stiff peaks it’s ready. The entire process should take between 8-10 minutes, depending on your mixer.

Mix together the dry ingredients. You really need to mix with your hands here. Add all the powdered sugar, cocoa powder, and almond flour to a bowl and stir with your fingers. As you’re mixing be sure to rub all the large almond chunks out of the mixture. These will completely screw up your batter, so we definitely don’t want them in there.

Now we start the macaronage – the hard part. Add about 1/3 of the dry ingredients and the food coloring to the meringue. Now gently fold by passing your spatula down the center of the bowl, scraping around all the edges, and around the bottom, finishing by folding that scraped-up portion back over itself. Down the center, around the edge, flip over. Repeat that process until the batter resembles lava. While you’re folding you should be trying to push a lot of the air out of the batter. To remove it simply push the batter up against the side of the bowl prior to you reaching the correct consistency. This video will maybe hopefully help you to see the proper consistency (even though it’s Uprising colors)!

Fill a piping bag fit with a large round tip with your batter. Pipe a big blob in one spot on a piece of parchment paper or silicone mat, trying to keep your piping pressure consistent. To get equal size circles you can either find a good template online or simply count the seconds you’re expelling your batter. The second method won’t be perfect, but it’ll be easier and close enough! It’s my favorite method.

Once all the macarons are piped simply bang the baking sheet on the counter a few times to remove any air that remains and allow them to sit out at room temperature for 30 minutes. This will allow a good skin to form on the macaron.

When the macarons are almost done resting preheat your oven. When it’s done preheating bake one sheet at a time on the middle rack for 12-15 minutes, or until completely baked.

After the macarons are baked leave them on your baking sheet until they’re completely cool. Then transfer them to a wire rack and prepare your fillings!

The ganache is the easy one. Add the cream to a small pot and heat on medium until the edges start to bubble. Stir the cream a bit and make sure the edges are lightly bubbling again. Pour the warm cream over the dark chocolate and allow it to sit for 20-30 seconds to melt the chocolate. Stir the ganache until everything is mixed, dark, and shiny. It’s gorgeous and delicious, but be patient while you’re waiting. It’ll feel like it’s taking a long time but it’ll come together.

Now to make the Swiss Meringue Buttercream. Separate your eggs whites from your yolks, add the sugar to the whites, place them in a stainless steel or glass bowl, and put them back over the double boiler we had for the curd. Whisk until the mixture reaches 160F to kill any potential Salmonella.

When the correct temperature is reached add the whites to the bowl of a stand mixer and whisk on high until the bowl starts to feel cool and the mixture gets thick and shiny. At this point you’ll start adding the room temperature butter, one tablespoon at a time. Once the butter in completely added, continue whisking until it becomes thick and smooth.

Zest one of the limes and juice all three limes. Add all the lime juice, lime zest, and the green gel food coloring. You may need to add some yellow food coloring to make the buttercream Outlaws green. Continue whisking until the buttercream comes back together. It’ll feel like it splits again, but be patient, it’ll come together, and get thick and creamy.

Now, all the elements are made! It’s time for assembly.

Match up the macaron shells to size. Turn one side over to prepare for adding the buttercream and the curd. Add the buttercream to a piping bag and pipe a ring on the outside of the shell. Fill the center of the ring with the ganache. You don’t need much ganache, you definitely want more buttercream than ganache. The dark chocolate is such a powerful flavor you don’t want to overwhelm the lime. Now cover with the other shell and make a sandwich.

One thing to note about macarons – they taste significantly better the next day. Everything looks so pretty you’ll be tempted to eat it right away. Don’t! Make these the day before you want them and then enjoy them the right way. When you let macarons sit the shells soak up some of the flavor from the fillings, making them seems more tender and less sweet. It’s worth the wait!

Houston Outlaws Macarons

  • Servings: about 16 2 inch macarons
  • Difficulty: difficult
  • Print

Lime and dark chocolate macarons, inspired by the Houston Outlaws

Macaron

  • 100 grams egg whites
  • 1/4 teaspoon cream of tartar
  • 75 grams sugar
  • 135 grams almond flour
  • 115 grams powdered sugar
  • 20 grams cocoa powder
  • black gel food coloring

Dark

  • 4 ounces heavy cream
  • 4 ounces dark chocolate

Lime

  • 75 grams egg whites
  • 75 grams sugar
  • 143 grams salted butter, room temperature
  • 3 limes, zest of one, juice of all 3
  • green gel food coloring
  • yellow gel food coloring, possibly

Macaron

  1. Separate your egg whites from your yolks, reserving one yolk for the curd. Place the whites in the bowl of a stand mixer
  2. Add a whisk attachment to the stand mixer and slowly increase the speed, bringing it up to high.
  3. Whisk until the eggs are frothy and then add all the cream of tartar at once.
  4. Continue whisking until the eggs form soft peaks. Add the sugar around the bowl and continue to whisk on high until stiff peaks form. The meringue should be stiff and peaks should not fall if turned over. The entire process should take between 8-10 minutes, depending on your mixer.
  5. Measure all the powdered sugar, cocoa powder, and almond flour to a bowl and stir with your fingers. As you’re mixing be sure to rub all the large almond chunks out of the mixture.
  6. Add about 1/3 of the dry ingredients and the food coloring to the meringue. Gently fold the dry into the meringue by passing your spatula down the center of the bowl, scraping around the edges, finishing by folding that scraped-up portion back over itself. Repeat that process until the batter resembles lava or honey. While you’re folding remove the air by pushing the batter up against the side of the bowl.
  7. Fill a piping bag fit with a large round tip with your batter. Pipe in a steady stream onto one spot on a piece of parchment paper or silicone mat, trying to keep your piping pressure consistent. To get equal size circles either find a template online or count the seconds you’re expelling your batter.
  8. Once all the macarons are piped bang the baking sheet on the counter a few times to remove any air that remains and allow them to sit out at room temperature for 30 minutes.
  9. Preheat your oven to 320F. Bake, one sheet at a time, for 12-15 minutes. The shells should be stiff, the feet shouldn’t jiggle, and the top shouldn’t shift if gently moved.
  10. Leave the macarons on your baking sheet until they’re completely cool.

Dark

  1. Heat heavy cream in a small pot on medium until the edges are lightly bubbling. Don’t let the cream boil, you don’t want to curdle it.
  2. Add warm cream to the chocolate and allow to sit for 20-30 seconds to melt chocolate.
  3. Stir until the mixture comes together, is homogeneous, and shiny.

Lime

  1. Separate your eggs whites from your yolks.
  2. Add your sugar to the whites.
  3. Place the bowl over a double boiler and whisk until the mixture reaches 160F.
  4. Whisk until the eggs reach a temperature of at least 160F, measured with a candy or instant-read thermometer.
  5. Add the whites to the bowl of a stand mixer and whisk on high until the bowl starts to feel cool and the mixture gets thick and shiny.
  6. Add the room temperature butter, one tablespoon at a time. In the process, the mixture will start to look curdled, but keep adding butter and keep whisking and it’ll become smooth and creamy again.
  7. When the buttercream is smooth and homogeneous add the lime juice, zest, and enough green and yellow food coloring to change the color to bright a bright, lime green. Continue whisking until the buttercream comes back together.

Macaron

  1. Match up the macaron shells to size. Turn one side over to prepare for adding the buttercream and the ganache.
  2. Add the buttercream to a piping bag and pipe a ring on the outside of the shell.
  3. Fill the center of the ring with the ganache.
  4. Cover with the other shell and make a sandwich. Refrigerate overnight for best flavor.

A strong, female playable character in Legend of Zelda

A strong, female playable character in Legend of Zelda

It’s International Women’s Day and it didn’t even cross my mind that maybe, just maybe, I should write something.  I am a woman, after all.  But then Megan from A Geeky Gal wrote a great post about Underrated Women in games and I remembered a post I wrote nearly 2 years ago about my favorite underrated woman in a video game.  The one and only Zelda.  So here’s a reblog of how I feel about Zelda and the potential for her story.


I wish more video games had strong female leads.  Having said that, I’m definitely not one of those people who needs a strong female to take over every male role.  In the immortal words of George R R Martin “To me being a feminist is about treating men and women the same” (Salter, The Telegraph, 2013).  There should be, and needs to be, a balance.  There are games that should be about male characters, and that’s okay!  And there are games that should be about female characters, and that’s also okay!

What I don’t like is the trend of taking a male character, turning them into a female character, and calling it “good enough”.  We don’t need yet another female who reminds us more of our brother than ourselves.  What we need is a character who is a woman who was meant to be a woman.  With that in mind, I don’t need Link to be a girl.  I need Link to continue to be a boy (because he so obviously is) and I need a game from Zelda’s point of view.

Zelda is already the strong, intelligent, awesome female character we need in the Legend of Zelda series.  She is brave, always fighting alongside Link, like she does as Sheik or Tetra.  She is fleshed out, created as a person with thoughts, opinions, and struggles, as is so poignantly brought home in the memories of Link in Breath of the Wild.  And, more importantly, she’s been there from the beginning.  This is not some character Nintendo would create out of nothing to prove to the public that they, too, care about women.  This would be a way for them to show that, from the beginning, they have cared about women.  It would be a way to prove that, just because their main hero in this series is male, it doesn’t mean they had a completely chauvinistic point of view.  I mean, these are the people who created Zelda’s Adventure, one of the few older games I have played from a female’s perspective!

And not only is Zelda already created, expanded, and real to the story, but she already has an amazing super power – the triforce of wisdom.  How easy would it be to make more difficult, challenging puzzles focusing on the idea that Zelda has to use her triforce of wisdom to defeat them?  Instead of the regularly-encountered boss, why not bosses with a big twist, requiring some serious forethought and skills to defeat them?

Don’t you guys agree that the absolute best remastered version of Ocarina of Time would be to include the original mode from Link’s point of view and a newly released mode from Zelda aka Sheik’s point of view?  It’s not like she sat around doing nothing for 7 years while Link was sealed away!  So what awesome shenanigans did she save Hyrule from?  Or to have a new Skyward Sword utilizing her very particular role at the temples, with new maps, puzzles, and her own set of bosses?

So, in my opinion, we don’t need a new female, playable character in the Zelda series.  We don’t even (in fact, please don’t!) need to make Link into a girl.  Nintendo just needs to jump on the idea they’ve already started and use the amazing character they already have. Let’s make a new Legend of Zelda about Zelda.

So what do you guys think?  Don’t be afraid to weigh in!  I’d love to hear your opinions.

Sauteed Nuts

Sauteed Nuts

Hands up if you’re ready for me to be done recovering and get on with the recipes?  Anyone?  Oh, I see a few in the back!  I’ll take it.

Guys, this last month or so has been quite the adventure.  I went to Disneyland and forgot to schedule a recipe.  I had surgery and forgot to schedule a few recipes.  And now I’m finally able to get up, move about the cabin, and get some baking/cooking in!  But as I’ve been easing back into my daily routine I needed something simple, basic, and, well, delicious. So I’m teaching you how to fry nuts.

Sauteed Nuts

Most people do it on a baking sheet in the oven, but did you know it’s just as easy to toast nuts on the stove? Maybe even easier. Are you ready for possibly one of the shortest recipes to date?

Start by heating a pan on medium heat. Unlike all my other posts where I go on and on about my cast iron skillets, this can honestly be any pan. When the pan is warm, add all the nuts. The trickiest part of this recipe is making sure nothing is “crowded”. What that means, in chef terms, is that there is space around each nut to shift around and have even heat distribution. It also means everything is in a single layer, not heaped on top of each other. If there’s too many nuts either do it in two batches or get a bigger pan.

Slowly toast the nuts over the medium heat until they smell fragrant and, well, nutty. Stir every few minutes with a spatula or simply by shaking the pan and tossing around the nuts in it. It’s a fancy chef thing… I usually just use a spatula…

Remove from the heat and allow to cool before adding to your recipe! You can also add the tiniest bit of water and kosher salt to the pan to salt-roast your nuts! But if you’re using them in a recipe, like this Nutcake, you’ll want them plain!

Link’s Sauteed Nuts:

  • Any Nut

Sauteed Nuts

  • Servings: 1 Cup
  • Difficulty: easy
  • Print

Toasted Nuts

Ingredients

  • 1 cup any whole, unroasted nut (walnut, peanut, pecan, etc…)

Directions

  1. Heat a pan on medium heat.
  2. When the pan is warm, add all the nuts, ensuring they aren’t crowded in the pan.
  3. Slowly toast the nuts over medium heat until they smell fragrant and nutty, stirring every few minutes with a spatula or by tossing.
  4. Remove from the heat and allow to cool before serving.

Hangzhou Spark Macarons

Hangzhou Spark Macarons

One of the new expansion teams, not many people knew what to expect from Hangzhou Spark. They swept into the first few games, overwhelming the competition and capturing the hearts of quite a few fans. Their bright, feminine colors didn’t hurt their appeal, either. They’ve tapered off a bit the last few games, but they’re still exciting to watch!

Hangzhou Spark Macarons

If you haven’t read the Boston Uprising Macaron post and recipe, please go do that now. I go into quite a bit of detail on how to make a macaron in it, the processes and the tricks. I’m not going to go through those things again, in order to make a shorter, more concise post, and a much easier read. So please, I’m begging you, go read that post!

Let’s start with the shells! One egg contains about 30 grams of whites, so this recipe will take about 3.5 eggs. Separate your egg whites from your yolks, placing the yolks in a separate bowl (to be used for the curd later) and place the whites in the bowl of a stand mixer. Add a whisk attachment (or use a bowl and hand whisk and watch as your arm falls off) and turn on the speed, slowly bringing it up to high. Continue to whisk until the eggs are frothy, then add all the cream of tartar at once. Continue whisking until the eggs start to form soft peaks.

At this point add the sugar. You can either do it the fancy way, one tablespoon at a time, but I just add the sugar around the bowl (not all in one spot) and continue to whisk on high until stiff peaks form. These peaks should not, under any circumstance, fall over if you tip the bowl or the whisk upside down. You want the meringue completely stiff (though not overwhipped. It’s a fine line). In order to make sure it’s not overwhipped, just watch it. As soon as it’s thick, shiny, and holding stiff peaks it’s ready. The entire process should take between 8-10 minutes, depending on your mixer.

Mix together the dry ingredients. You really need to mix with your hands here. Add all the powdered sugar and almond flour to a bowl and stir with your fingers. As you’re mixing be sure to rub all the large almond chunks out of the mixture. These will completely screw up your batter, so we definitely don’t want them in there.

Now we start the macaronage – the hard part. Add about 1/3 of the dry ingredients and the food coloring to the meringue. Now gently fold by passing your spatula down the center of the bowl, scraping around all the edges, and around the bottom, finishing by folding that scraped-up portion back over itself. Down the center, around the edge, flip over. Repeat that process until the batter resembles lava. While you’re folding you should be trying to push a lot of the air out of the batter. To remove it simply push the batter up against the side of the bowl prior to you reaching the correct consistency. This video will maybe hopefully help you to see the proper consistency (even though it’s Uprising colors)!

Fill a piping bag fit with a large round tip with your batter. Pipe a big blob in one spot on a piece of parchment paper or silicone mat, trying to keep your piping pressure consistent. To get equal size circles you can either find a good template online or simply count the seconds you’re expelling your batter. The second method won’t be perfect, but it’ll be easier and close enough! It’s my favorite method.

Once all the macarons are piped simply bang the baking sheet on the counter a few times to remove any air that remains and allow them to sit out at room temperature for 30 minutes. This will allow a good skin to form on the macaron.

When the macarons are almost done resting preheat your oven. When it’s done preheating bake one sheet at a time on the middle rack for 12-15 minutes, or until completely baked.

After the macarons are baked leave them on your baking sheet until they’re completely cool. Then transfer them to a wire rack and prepare your fillings!

Bring water to a simmer in a small pot. Zest a grapefruit into a stainless steel or glass bowl that will fit in the rim of the pot. Juice the grapefruit, leaving the pulp but removing any pith (the white parts) and any seeds. Add the sugar and whisk until thoroughly combined. Add the egg and yolk and whisk together. Once you add the eggs, whisk continuously to prevent the sugar from “cooking” the yolks.

Put the bowl over the simmering water and whisk until the curd thickens. It’ll happen around 180F. The curd will thicken, feel sluggish, and stick to the whisk and side of the bowl. When this happens, remove the bowl from the simmering pan and add the butter all at once. Whisk until the butter is incorporated and then allow to cool until the curd reaches room temperature. You can speed this up by putting the bowl in the fridge and whisk from time to time to release the heat.

Now to make the Swiss Meringue Buttercream. Separate your eggs whites from your yolks, add the sugar to the whites, place them in a stainless steel or glass bowl, and put them back over the double boiler we had for the curd. Whisk until the mixture reaches 160F to kill any potential Salmonella.

When the correct temperature is reached add the whites to the bowl of a stand mixer and whisk on high until the bowl starts to feel cool and the mixture gets thick and shiny. At this point you’ll start adding the room temperature butter, one tablespoon at a time. Once the butter in completely added, continue whisking until it becomes thick and smooth.

Add all the vanilla, coconut milk, and the blue gel food coloring. Continue whisking until the buttercream comes back together. It’ll feel like it splits again, but be patient, it’ll come together, and get thick and creamy.

Now, all the elements are made! It’s time for assembly.

Match up the macaron shells to size. Turn one side over to prepare for adding the buttercream and the curd. Add the buttercream to a piping bag and pipe a ring on the outside of the shell. Fill the center of the ring with the curd. Now cover with the other shell and make a sandwich.

And now for my favorite brainchild so far! These Spark macarons needed a little… spark. So once everything is assembles open the packages of Pop Rocks, place it in a pile on a plate, and roll the macarons in the Pop Rocks. They’ll stick to the buttercream and make a fantastic addition to presentation and flavor! Just make sure you only coat the macarons right before you serve/eat them. The Pop Rocks react with the buttercream and start to lose their spark.

One thing to note about macarons – they taste significantly better the next day. Everything looks so pretty you’ll be tempted to eat it right away. Don’t! Make these the day before you want them and then enjoy them the right way. When you let macarons sit the shells soak up some of the flavor from the fillings, making them seems more tender and less sweet. It’s worth the wait!

Hangzhou Spark Macarons

  • Servings: about 16 2 inch macarons
  • Difficulty: difficult
  • Print

Grapefruit and coconut macarons rolled in Pop Rocks, inspired by the Hangzhou Spark

Macaron

  • 100 grams egg whites
  • 1/4 teaspoon cream of tartar
  • 75 grams sugar
  • 135 grams almond flour
  • 125 grams powdered sugar
  • pink gel food coloring

Grapefruit

  • 98 grams grapefruit juice (about 2 medium grapefruit)
  • 85 grams sugar
  • 25 grams salted butter, room temperature
  • 1 egg
  • 1 egg yolk

Coconut

  • 75 grams egg whites
  • 75 grams sugar
  • 143 grams salted butter, room temperature
  • 6 tablespoons full fat coconut milk
  • 1/2 teaspoon vanilla
  • blue gel food coloring

Macaron

  1. Separate your egg whites from your yolks, reserving one yolk for the curd. Place the whites in the bowl of a stand mixer
  2. Add a whisk attachment to the stand mixer and slowly increase the speed, bringing it up to high.
  3. Whisk until the eggs are frothy and then add all the cream of tartar at once.
  4. Continue whisking until the eggs form soft peaks. Add the sugar around the bowl and continue to whisk on high until stiff peaks form. The meringue should be stiff and peaks should not fall if turned over. The entire process should take between 8-10 minutes, depending on your mixer.
  5. Measure all the powdered sugar and almond flour to a bowl and stir with your fingers. As you’re mixing be sure to rub all the large almond chunks out of the mixture.
  6. Add about 1/3 of the dry ingredients and the food coloring to the meringue. Gently fold the dry into the meringue by passing your spatula down the center of the bowl, scraping around the edges, finishing by folding that scraped-up portion back over itself. Repeat that process until the batter resembles lava or honey. While you’re folding remove the air by pushing the batter up against the side of the bowl.
  7. Fill a piping bag fit with a large round tip with your batter. Pipe in a steady stream onto one spot on a piece of parchment paper or silicone mat, trying to keep your piping pressure consistent. To get equal size circles either find a template online or count the seconds you’re expelling your batter.
  8. Once all the macarons are piped bang the baking sheet on the counter a few times to remove any air that remains and allow them to sit out at room temperature for 30 minutes.
  9. Preheat your oven to 320F. Bake, one sheet at a time, for 12-15 minutes. The shells should be stiff, the feet shouldn’t jiggle, and the top shouldn’t shift if gently moved.
  10. Leave the macarons on your baking sheet until they’re completely cool.

Grapefruit

  1. Create a double boiler by choosing a stainless steel or glass bowl that fits securely in the rim of a small pot. Add enough water to boil in the small pot, but ensure that the water level won’t touch the bottom of the bowl. It should be about 1-2 inches of water. Bring water to a simmer.
  2. Zest and juice the grapefruit, removing any seeds or pith, but leaving any flesh. Add the juice and zest to the chosen bowl and add the sugar. Whisk this together and add the yolk and whole egg.
  3. Put the bowl over the simmering water and whisk until the curd thickens. The curd will reach around 180F, will stick to the whisk, and feel thick.
  4. Remove the bowl from the simmering pan and add the butter all at once. Whisk until the butter is incorporated and then allow to cool until the curd reaches room temperature.

Coconut

  1. Separate your eggs whites from your yolks.
  2. Add your sugar to the whites.
  3. Place the bowl over a double boiler and whisk until the mixture reaches 160F.
  4. Whisk until the eggs reach a temperature of at least 160F, measured with a candy or instant-read thermometer.
  5. Add the whites to the bowl of a stand mixer and whisk on high until the bowl starts to feel cool and the mixture gets thick and shiny.
  6. Add the room temperature butter, one tablespoon at a time. In the process, the mixture will start to look curdled, but keep adding butter and keep whisking and it’ll become smooth and creamy again.
  7. When the buttercream is smooth and homogeneous add all the coconut milk, vanilla, and enough blue gel food coloring to change the color to bright baby blue. Continue whisking until the buttercream comes back together.

Macaron

  1. Match up the macaron shells to size. Turn one side over to prepare for adding the buttercream and the curd.
  2. Add the buttercream to a piping bag and pipe a ring on the outside of the shell.
  3. Fill the center of the ring with the grapefruit curd.
  4. Cover with the other shell and make a sandwich. Refrigerate overnight for best flavor.
  5. Place Pop Rocks in a pile on a plate.
  6. Roll the macarons in the Pop Rocks, coating the buttercream.

Boston Uprising Macarons

Boston Uprising Macarons

I’ve been looking forward to introducing this new series for a long time! I was inspired by Victoria over at Pixelated Provisions, who started a series last year featuring each of the Overwatch League (OWL) teams as popsicles. Such a cool project, right?! Well I love OWL probably nearly as much as she does and I’ve been so excited to try and mimic her brilliant idea. But instead of something easy and awesome like popsicles, I decided to choose something complicated, but delicious! Every other Sunday through this season of OWL I’ll be posting a new team-inspired macaron! So let’s learn how to make macarons! By the way – if you don’t already follow Victoria, please go do that right now! She’s incredible, her food always looks divine, her plating is unbelievable, and she’s super nice to boot!

But first, let’s talk about the Boston Uprising. When I first heard there was going to be an Overwatch city-based league I was ecstatic. And then they announced there would be a team from Boston. Ever since I was a kid, I’ve been a Boston fan. My dad was a fan, which meant I was a fan – born and bred, live and die. So I knew the Uprising had to be my team. But stage one was so hard on my heart. They struggled, they lost, they, well, weren’t great. But I never stopped loving them, and by the end they proved to the world that they were a better team than you could have ever dreamed. They pushed through troubles and trials and came out with the only perfect stage and a place in the finals.

True to the Boston spirit, they are once again the underdogs in season 2. But as they’ve shown in the past, and proved on Thursday, they aren’t going anywhere but up. I’m so proud of those boys and all they work to accomplish. And I’m excited to continue to love them through this next season and the future! Boston UP!

Boston Uprising Macarons

Fair warning – this post is going to be a long one. Macarons can be intensely complicated things, and I didn’t go easy on you for this first one. There are three components to this macaron, but first and foremost, there’s the shell. Easily the hardest part. They may take you several tries to get it right (it took me 10 to be able to consistently make them), but don’t let that bother you. I have faith in your abilities! If you want an insanely good tutorial, check out Indulge with Mimi. I learned all my tips and tricks from her!

Let’s start with a few things that are very important for making a good macaron.

  • Your eggs should be room temperature. Most of the time I don’t think it matters, but with macarons it really does. There’s something about a room temperature meringue mixing with the almond flour and sugar that makes a big difference in your shell quality.
  • Everything should be free from water. This includes any bowls, whisks, or spatulas you use. Water can cause a meringue to split, and that would completely defeat the purpose of making one!
  • Folding in the dry ingredients to the meringue is called macaronage and it is the most important step in this entire process. If you fold too little, you’ll get grainy macarons that will be lumpy. If you fold too much you’ll get flat, crunchy macarons without any feet. It’s a really delicate process that may take you a few tries to get right. But I have faith in you. You got this. The final macaron batter should look like honey or lava, and should run from your spatula slowly and without any breaks.
  • Only use gel food coloring. The other kind has water in it, and we really don’t want to add any excess liquid to your meringue. It’ll completely ruin the meringue. So, for the sake of your mental health, only use gel!
  • The rest is extremely important. If your macarons don’t acquire a dry outer coat they won’t bake properly.  Never skip the rest.
  • In order to make sure your macarons are baked properly, the top shouldn’t move if lightly jiggled during baking. If there’s any major movement, the insides are still raw. Be patient – it can even be better to overbake than underbake a macaron shell.

We are making a french meringue macaron – probably the most simple of the meringues. It’s as simple as making a french meringue, folding in some dry ingredients, and piping into circles. So let’s start by separating your egg whites from your yolks. One egg contains about 30 grams of whites, so this recipe will take about 3.5 eggs. Put the yolks aside in a bowl (to be used for the curd later) and place the whites in the bowl of a stand mixer.

Let’s make the meringue now! Add a whisk attachment (or use a bowl and hand whisk and watch as your arm falls off) and turn on the speed, slowly bringing it up to high. Continue to whisk until the eggs are frothy, then add all the cream of tartar at once. Continue whisking until the eggs start to form soft peaks.

At this point we want to add the sugar. Now, a lot of people add it a tablespoon at a time to prevent grainy meringues. Honestly, I’ve never had a problem, and with a macaron you probably can’t tell anyway. So just add the sugar around the bowl (not all in one spot) and continue to whisk on high until stiff peaks form. These peaks should not, under any circumstance, fall over if you tip the bowl or the whisk upside down. You want the meringue completely stiff. The entire process should take between 8-10 minutes, depending on your mixer.

Next comes the hard part – the part that’ll screw everything else up. We are going to fold in the flour and sugar. But first things first – let’s mix together the dry ingredients. You really need to mix with your hands here. Add all the powdered sugar and almond flour to a bowl and stir with your fingers. As you’re mixing be sure to rub all the large almond chunks out of the mixture. These will completely screw up your batter, so we definitely don’t want them in there.

Now we start the macaronage. Add about 1/3 of the dry ingredients and the food coloring to the meringue. Now gently fold by passing your spatula down the center of the bowl, scraping around all the edges, and around the bottom, finishing by folding that scraped-up portion back over itself. Down the center, around the edge, flip over. Repeat that process until the batter resembles, as I’ve mentioned above, lava. While you’re folding you should be trying to push a lot of the air out of the batter. We actually, in spite of making a meringue, don’t want a ton of air in the batter. To remove it simply push the batter up against the side of the bowl prior to you reaching the correct consistency. This video will maybe hopefully help with your ability to see what I’m talking about!

Once the macaron batter is ready simply fill a piping bag fit with a large round tip with your batter. Pipe a big blob in one spot on a piece of parchment paper or silicone mat, trying to keep your piping pressure consistent. To get equal size circles you can either find a good template online or simply count the seconds you’re expelling your batter. The second method won’t be perfect, but it’ll be easier and close enough! It’s my favorite method.

Once all the macarons are piped simply bang the baking sheet on the counter a few times to remove any air that remains (to prevent weird holes) and allow them to sit out at room temperature, for 30 minutes. This rest will allow a good skin to form on the macaron.

When the macarons are almost done resting preheat your oven. When it’s done preheating bake one sheet at a time on the middle rack for 12-15 minutes. Just make sure you check it before you pull them out, like I talk about in the notes, to ensure they’re properly baked.

After the macarons are baked leave them on your baking sheet until they’re completely cool. If you don’t they’ll still be slightly sticky and the centers will come out of the shell and stick to the mat. It’s horribly annoying. So just be patient and they’ll come off really easily!

While the macarons are baking/cooling you can make your curd and your buttercream. Honestly, the curd takes a while to cool, so let’s do that first! It’s much easier than the shell – I promise. We need to cook the curd over a double boiler, so use a stainless steel or glass bowl that fits securely in the rim of a small pot. Add enough water to boil in the small pot, but ensure that the water level won’t touch the bottom of the bowl. It should be about 1-2 inches of water. Bring water to a simmer.

Then blend your blueberries until pureed. It doesn’t have to be perfect, but as smooth as you can get. Add the blueberry puree and lemon juice to either a stainless steel or glass bowl and add the sugar. Whisk this together and add the yolk (saved from the shells) and whole egg. Once you add the eggs you need to whisk continuously to prevent the sugar from cooking the yolks. It sounds weird, but the sugar can actually do that to the yolk and make it grainy.

Put the bowl over the simmering water and whisk until the curd thickens. It’ll happen around 180F, for those of you with a thermometer. But in reality, you don’t need one. You’ll be in the middle of whisking, feeling like it’s taking forever, and then you’ll feel it thicken. You’ll be able to see it sticking thickly to the whisk and to the bowl, it’ll feel sluggish and look delicious. When this happens, remove the bowl from the simmering pan and add the butter all at once. Whisk until the butter is incorporated and then allow to cool until the curd reaches room temperature. You can speed this up by putting the bowl in the fridge and whisk from time to time to release the heat.

Now, 2 elements down, let’s make the third! It’s one of my favorite things in the world – a lemon Swiss meringue buttercream. If you’ve never made a Swiss meringue buttercream it;s the most amazing thing in the entire world. I thought I hated frosting, even homemade frosting, but I realized what I really hated was American buttercream. A solid, Swiss buttercream is thick, creamy, and not overpoweringly sweet. It’s perfect, though a lot trickier to make.

Start by separating your eggs whites from your yolks. Guys, I’ve had to find a lot of new recipes for all the yolks I have leftover from the frosting I’ve been made… But I digress. You’ll add your sugar to the whites, put them back over that double boiler we had for the curd, and whisk until the mixture reaches 160F. This time you’ll want to have a thermometer – it’s very important the eggs reach at least 160F to kill off the threat of salmonella before you eat it. There’s not really a visual cue for this, either, so you’ll need something to help you.

When the correct temperature is reached add the whites to the bowl of a stand mixer and whisk on high until the bowl starts to feel cool and the mixture gets thick and shiny. At this point you’ll start adding the room temperature butter, one tablespoon at a time. It’ll take a while to get through all the butter. And, in the process, the mixture will start to look curdled. You’ll panic that something went wrong. I promise, nothing went wrong. Just keep adding butter and keep whisking and it’ll become smooth and buttery and delicious.

While this is wash and zest the lemon and juice it. You’ll be tempted to just use pre-juiced lemon juice. Don’t. Fresh-pressed lemon juice is a little sweeter and a little more acidic. Everything will taste better if you just get in the habit of always having lemons on hand.

When the buttercream is smooth and homogeneous you’ll add all the lemon juice, zest, and the yellow gel food coloring. Continue whisking until the buttercream comes back together. It’ll feel like it splits again, but be patient, it’ll come together, get thick, and creamy.

Now, all the elements are made! It’s time for assembly.

Match up the macaron shells to size. Turn one side over to prepare for adding the buttercream and the curd. Add the buttercream to a piping bag and pipe a ring on the outside of the shell. Fill the center of the ring with the blueberry curd. Now cover with the other shell and make a sandwich.

One thing to note about macarons – they taste significantly better the next day. Everything looks so pretty you’ll be tempted to eat it right away. Don’t! Make these the day before you want them and then enjoy them the right way. When you let macarons sit the shells soak up some of the flavor from the fillings, making them seems more tender and less sweet. It’s worth the wait!

Boston Uprising Macarons

  • Servings: about 16 2 inch macarons
  • Difficulty: difficult
  • Print

Blueberry and lemon macarons inspired by the Boston Uprising

Macaron

  • 100 grams egg whites- 1/4 teaspoon cream of tartar- 75 grams baker’s sugar- 125 grams almond flour- 125 grams powdered sugar- blue gel food coloring

Blueberry

  • 98 grams blueberry puree (about 1/2 cup blueberries)- 85 grams sugar- 25 grams salted butter, room temperature- 1 egg- 1 egg yolk

Lemon

  • 75 grams egg whites- 75 grams sugar- 143 grams salted butter, room temperature- 2 tablespoons lemon juice- zest of one lemon- yellow gel food coloring

Macaron

  1. Separate your egg whites from your yolks, reserving one yolk for the blueberry curd. Place the whites in the bowl of a stand mixer2. Add a whisk attachment to the stand mixer and slowly increase the speed, bringing it up to high.3. Whisk until the eggs are frothy and then add all the cream of tartar at once.4. Continue whisking until the eggs form soft peaks. Add the sugar around the bowl and continue to whisk on high until stiff peaks form. The meringue should be stiff and peaks should not fall if turned over. The entire process should take between 8-10 minutes, depending on your mixer.5. Measure all the powdered sugar and almond flour to a bowl and stir with your fingers. As you’re mixing be sure to rub all the large almond chunks out of the mixture.6. Add about 1/3 of the dry ingredients and the food coloring to the meringue. Gently fold the dry into the meringue by passing your spatula down the center of the bowl, scraping around the edges, finishing by folding that scraped-up portion back over itself. Repeat that process until the batter resembles lava or honey. While you’re folding remove the air by pushing the batter up against the side of the bowl. 7. Fill a piping bag fit with a large round tip with your batter. Pipe in a steady stream onto one spot on a piece of parchment paper or silicone mat, trying to keep your piping pressure consistent. To get equal size circles either find a template online or count the seconds you’re expelling your batter.8. Once all the macarons are piped bang the baking sheet on the counter a few times to remove any air that remains and allow them to sit out at room temperature for 30 minutes.9. Preheat your oven to 320F. Bake, one sheet at a time, for 12-15 minutes. The shells should be stiff, the feet shouldn’t jiggle, and the top shouldn’t shift if gently moved.10. Leave the macarons on your baking sheet until they’re completely cool.

Blueberry

  1. Create a double boiler by choosing a stainless steel or glass bowl that fits securely in the rim of a small pot. Add enough water to boil in the small pot, but ensure that the water level won’t touch the bottom of the bowl. It should be about 1-2 inches of water. Bring water to a simmer.2. Blend your blueberries until pureed. Add the blueberry puree and lemon juice to the chosen bowl and add the sugar. Whisk this together and add the yolk and whole egg.3. Put the bowl over the simmering water and whisk until the curd thickens. The curd will reach around 180F, will stick to the whisk, and feel thick. 4. Remove the bowl from the simmering pan and add the butter all at once. Whisk until the butter is incorporated and then allow to cool until the curd reaches room temperature.

Lemon

  1. Separate your eggs whites from your yolks.2. Add your sugar to the whites.3. Place the bowl over a double boiler and whisk until the mixture reaches 160F.4. Whisk until the eggs reach a temperature of at least 160F, measured with a candy or instant-read thermometer.5. Add the whites to the bowl of a stand mixer and whisk on high until the bowl starts to feel cool and the mixture gets thick and shiny.6. Add the room temperature butter, one tablespoon at a time. In the process, the mixture will start to look curdled, but keep adding butter and keep whisking and it’ll become smooth and creamy again.7. Wash and zest the lemon and juice it.8. When the buttercream is smooth and homogeneous add all the lemon juice, zest, and enough yellow gel food coloring to change the color to bright yellow. Continue whisking until the buttercream comes back together.

Macaron

  1. Match up the macaron shells to size. Turn one side over to prepare for adding the buttercream and the curd.2. Add the buttercream to a piping bag and pipe a ring on the outside of the shell.3. Fill the center of the ring with the blueberry curd.4. Cover with the other shell and make a sandwich. Refrigerate overnight for best flavor.

Cream of Mushroom Soup

Cream of Mushroom Soup

Happy Valentine’s Day! To tell the truth, my husband and I don’t actually celebrate this one… Not that we have anything against it, but with birthdays and holidays so close to this date it just feels like too much to celebrate yet another holiday where giving gifts is recommended. So tonight we will be celebrating by eating take out and watching Overwatch League, which has finally started up again (YAY!). But, in honor of the holiday, I have the least romantic dish possible to share with you. Guys, I don’t know why I didn’t plan this better, but I totally spaced that this post would come out on a holiday celebrating love. So instead of sweets, dessert, or even a romantic dinner option, I bring you Cream of Mushroom Soup…

Cream of Mushroom Soup
time and difficulty

I need to admit something. I relied heavily on the recipe of Cafe Delites for this one. I’ve never in my wildest dreams thought of making cream of mushroom soup from scratch. Frankly, the only time I use it is in my stroganoff recipe. So I needed a lot of guidance to even know what direction to head in. I changed a few things, made a few additions of my own, but definitely check her recipe out if you want the pure, unadulterated version!

We start by chopping mushrooms, dicing onions, and mincing garlic. All pretty basic stuff at this point.

Next, heat some butter in a pot… or dutch oven (you guys know me so well) over medium heat. Add the onions and saute until golden and shiny. Then add the garlic and stir for just a minute or so. Garlic burns so easily and we don’t want to overdo it. When everything smells nice add the mushrooms and salt and pepper and saute until they start to change color and become soft. We don’t really want to cook them too much or they’ll be rubbery at the end.

When everything is ready add the seasonings and flour and stir until everything is completely coated. Then we deglaze the fond. I’ve talked about deglazing before and it’s my favorite way to ensure that all the seasonings stay in your dish. Just add a few tablespoons (or splashes, we aren’t fancy here) of your chosen broth to the pot and scrape the bottom until all that delicious brown stuff comes up.

Once it’s all off the pot add half the remaining broth to the pot and stir continuously until it heats and starts to thicken. Then add the remaining broth, stir until combined, and allow it to simmer for about 10 minutes. It’ll start to thicken up and smell delicious. If it doesn’t look thick enough for your tastes at this point simply add some flour to the pot and whisk it until there’s no lumps. Allow to cook for a few more minutes until it thickens.

Add all the milk and allow to heat until barely simmering. Add more salt and pepper as needed and serve while it’s hot! This soup will even save for a few days to add to other recipes you may have (like the aforementioned stroganoff). It actually turned out way better than I thought it would! I’d eat it as it is next time, just because it smelled so delicious!

Link’s Veggie Cream Soup:

  • Fresh Milk
  • Rock Salt
  • Any Mushroom
  • Any vegetable, herb, or flour

Cream of Mushroom Soup

  • Servings: 4
  • Difficulty: easy
  • Print

A savory, fragrant cream of mushroom soup

Ingredients

  • 4 tablespoons salted butter- 1 medium yellow onion- 2 garlic cloves- 1 pound fresh mushrooms (can be white or brown)- 1 teaspoon kosher salt- 1/2 teaspoon black pepper- 1/2 teaspoon oregano (or 1.5 teaspoons fresh oregano)- 1 teaspoon thyme (or 2 teaspoons fresh thyme)- 10 fennel seeds- 1 bay leaf- 1/4 cup all-purpose flour- 4 cups vegetable broth (for vegetarian) or beef broth- 1.5 cups milk

Directions

  1. Chop the mushrooms into bite-size pieces. Dice the onion and mince the garlic. 2. Heat the butter in a pot over medium heat.3. Add the onions and saute until golden and shiny.4. Add the garlic and stir until fragrant, about 1 minute.5. Add the mushrooms and salt and pepper and saute until they start to change color and become soft.6. Add the seasonings and flour and stir until everything is completely coated.7. Deglaze the fond by adding a few tablespoons of your chosen broth to the pot and scrape the bottom until all the brown bits are removed.8. Add half the remaining broth to the pot and stir continuously until it heats and starts to thicken, about 5 minutes. 9. Add the remaining broth, stir until combined, and allow it to simmer for about 10 minutes. If it doesn’t look thick enough at this point simply add some flour to the pot and whisk it until there’s no lumps. Allow to cook for a few more minutes until it thickens.10. Add all the milk and allow to heat until barely simmering. Add more salt and pepper as needed and serve while it’s hot!